How to Customize Blogger Comments By Adding a Background Color and Border
The comments are an essential part of a blog because in them is reflected the readers' opinions regarding a post or our blog, so it is important to spend a little of our time to make this part looking more presentable, accessible and neat.
To set in order our comments, it is necessary to make each comment easy to identify, therefore to know from where it begins and to where it ends, otherwise it becomes a jumble of letters of which the reader can run away. Here are some ways to make some order by separating each comment.
- Add a Separator To Blogger Comments
- Add a Divider Below Comments in Blogger
- Fully Customize Your Blogger Comments By Changing The Background Color and Border
 The first method is the easiest, and is about how to put a border below our comments, this is to separate each blog comment in a simple but effective way.

Step 1. To add a simple separator go to Template > Edit HTML and click on the small arrow on the left of <b:skin>...</b:skin>
 Step 2. Click anywhere inside the code area and search using CTRL + F keys, for the following piece of code:

Step 3. Paste the following style just above it:
- If we are using threaded comments (with the reply option):
- If we are using previous commenting system (with no reply option)
Note: To change the border's color, replace the bolded color value and to change its thickness, increase/decrease the 1 value.
Step 4. Save the Template.
Instead of a simple border, we can also add a divider/image between our comments.

Step 1. Go to Template > Edit HTML and search (CTRL + F) for the following piece of code:

Step 2. Paste the following just above it:
- If we are using threaded comments (with the reply option):
- If we are using previous commenting system (with no reply function)
Note: The URL that is in blue represents the image that you can change as you like, just remember that at the height must set the height of an image with 30px more, for instance, if the image's height is 50px then the value will be 80px. This is for making sure that the image won't overlap the date of comments. (for threaded comments, increase/decrease the padding 30 value)
Step 3. Save the Template.
But you can still have more styles for each comment, for example adding a background color and a border.
 Step 1. Go to Template > Edit HTML and search for the following piece of code:
Step 2. Paste the following just above it:
- If we are using threaded comments (with the reply option):
Step 3. Save the Template.
- If we are using previous commenting system (with no reply function):
Step 1. Search for this line in your template:
Step 2. Then, add the following code just below of it:
Step 3. Look a little further down and you'll see the </b:loop> code and just above it, add this:
Step 4. Now find this:
Step 5. And just above of it, add this CSS code:
In either case, you can change the background color, border, etc.. in parts with annotations in green.
Step 6. Save the Template.
If you need more help, leave a comment below.
To set in order our comments, it is necessary to make each comment easy to identify, therefore to know from where it begins and to where it ends, otherwise it becomes a jumble of letters of which the reader can run away. Here are some ways to make some order by separating each comment.
- Add a Separator To Blogger Comments
- Add a Divider Below Comments in Blogger
- Fully Customize Your Blogger Comments By Changing The Background Color and Border

How to Add a Separator/Border To Blogger Comments

Step 1. To add a simple separator go to Template > Edit HTML and click on the small arrow on the left of <b:skin>...</b:skin>

]]></b:skin>

Step 3. Paste the following style just above it:
- If we are using threaded comments (with the reply option):
.comment-block {
border-bottom: 1px solid #000000;
}
.comments .continue {
border-top: 0px solid $(widget.alternate.text.color);
}
- If we are using previous commenting system (with no reply option)
#comments-block .comment-footer {
border-bottom:1px solid #000000;
}
Note: To change the border's color, replace the bolded color value and to change its thickness, increase/decrease the 1 value.
Step 4. Save the Template.
Instead of a simple border, we can also add a divider/image between our comments.
How to Add a Divider (Image) Between Each Comment in Blogger

Step 1. Go to Template > Edit HTML and search (CTRL + F) for the following piece of code:
]]></b:skin>
Screenshot:

Step 2. Paste the following just above it:
- If we are using threaded comments (with the reply option):
.comment-block {
background-image:url(https://blogger.googleusercontent.com/img/b/R29vZ2xl/AVvXsEjEXpBTk1OAlqPfNm_73ZG5GWnOR5jCIRirtvl-8aEHdMDHJM89U3pLjEFnwMtb0lV_rRiEN-OEpnGI-lVn1MQ89D6Jq6GD5xTAxPh8zOi_1c048lOptMQDvSmY9b9nLCHVI2ETMCwMK1sh/s1600/74.gif);
background-repeat:no-repeat;
background-position:center bottom;
padding-bottom:30px;
margin-top: -10px;
}
.comments .continue {
border-top: 0px solid $(widget.alternate.text.color);
}
- If we are using previous commenting system (with no reply function)
#comments-block .comment-footer {
background-image:url(https://blogger.googleusercontent.com/img/b/R29vZ2xl/AVvXsEjEXpBTk1OAlqPfNm_73ZG5GWnOR5jCIRirtvl-8aEHdMDHJM89U3pLjEFnwMtb0lV_rRiEN-OEpnGI-lVn1MQ89D6Jq6GD5xTAxPh8zOi_1c048lOptMQDvSmY9b9nLCHVI2ETMCwMK1sh/s1600/74.gif);
background-repeat:no-repeat;
background-position:center bottom;
height: 50px;
}
Note: The URL that is in blue represents the image that you can change as you like, just remember that at the height must set the height of an image with 30px more, for instance, if the image's height is 50px then the value will be 80px. This is for making sure that the image won't overlap the date of comments. (for threaded comments, increase/decrease the padding 30 value)
Step 3. Save the Template.
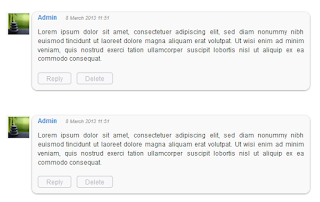
But you can still have more styles for each comment, for example adding a background color and a border.
How to Add A Border and A Background Color To Blogger Comments

]]></b:skin>
Step 2. Paste the following just above it:
- If we are using threaded comments (with the reply option):
.comment-block {
background:#F9F9F9; /* Background Color */
border: 1px solid #f1f1f1; /* Border style */
margin-bottom:20px;
-webkit-box-shadow: 0 1px 2px rgba(0, 0, 0, .4);
-moz-box-shadow: 0 1px 2px rgba(0, 0, 0, .4);
box-shadow: 0 1px 2px rgba(0, 0, 0, .4);
-moz-border-radius: 10px;
-webkit-border-radius: 10px;
border-radius: 10px;
}
.comments .comment-thread.inline-thread {
background-color: #FAFAFA; /* Background color behind the replies */
border-left: 4px dotted #E6E6E6; /* Border on the left side of replies */
}
.comment-content {
padding:2px 10px 10px 10px;
color:#444444; /* Font Color in Comments */
}
.datetime a {
font-style:italic;
font-size:9px;
margin-left: 2px;
}
.comments .comments-content .user a{
color:#1982D1; /* Author's name color */
font-size: 12px; /* Author's name size */
padding-left: 10px;
font-weight:bold;
text-decoration:none;
}
.comments .comment .comment-actions a,.comments .comment .continue a{
display:inline-block;
margin:0 0 10px 10px;
padding:0 15px;
color:#B4B4B7;
text-align:center;
text-decoration:none;
background:#F8F8FB;
border:1px solid #C2C2C5;
border-radius:4px;
height:20px;
line-height:20px;
font-weight:normal;
cursor:pointer;
}
.comments .continue {
border-top: 0px solid $(widget.alternate.text.color);
}
.comments .comments-content .icon.blog-author {
background-image: none;
margin-left: -10px;
}
.comments .avatar-image-container{
margin: 0px 0px 0px 0px;
padding: 0px 0px 0px 0px;
width: 40px;
max-height: 40px;
border: 1px solid #F2F2F2;
padding: 1px;
}
.comments .avatar-image-container img{
margin: 0px 0px 0px 0px;
padding: 0px 0px 0px 0px;
max-width: 40px;
height: 40px;
}
Step 3. Save the Template.
- If we are using previous commenting system (with no reply function):
Step 1. Search for this line in your template:
<b:loop values='data:post.comments' var='comment'>
Step 2. Then, add the following code just below of it:
<div class='comments-ct'>
Step 3. Look a little further down and you'll see the </b:loop> code and just above it, add this:
</div>
Step 4. Now find this:
]]></b:skin>
Step 5. And just above of it, add this CSS code:
.comments-ct{(The rounded edges will not work in Internet Explorer with CSS)
background:#F9F9F9; /* Background Color */
border: 1px solid #f1f1f1; /* Bprder Style */
margin-bottom:20px;
-webkit-box-shadow: 0 1px 2px rgba(0, 0, 0, .4);
-moz-box-shadow: 0 1px 2px rgba(0, 0, 0, .4);
box-shadow: 0 1px 2px rgba(0, 0, 0, .4);
-moz-border-radius: 10px;
-webkit-border-radius: 10px;
border-radius: 10px;
}
.comment-body {
color:#444444; /* Font Color in Comments */
padding:10px;
}
.comments-ct a {
padding-left: 5px; /* Link color */
color: #4A9BD8;
}
.comment-timestamp a {
font-style:italic;
font-size:9px;
padding-right:10px;
padding-left:10px;
}
In either case, you can change the background color, border, etc.. in parts with annotations in green.
Step 6. Save the Template.
If you need more help, leave a comment below.
Categories:
Blog Design,
Comments,
Hacks,
how to


Komentar ini telah dihapus oleh pengarang.
BalasHapusI am really glad to see your post and your work was so brilliant. Much appreciated!! Buy Styalge Hydro
BalasHapusmph club® offers a wide variety of exotic car rentals in Miami ready to be driven around the beautiful sea side. Other services that we offer include chauffeur service for major events, business trips, or exciting vacation. Drive the cars you see in these pictures today
BalasHapusbitcoin
I think that thanks for the valuabe information and insights you have so provided here.
BalasHapusdark web
Wonderful blog! I found it while surfing around on Yahoo News. Do you have any suggestions on how to get listed in Yahoo News? I’ve been trying for a while but I never seem to get there! Appreciate it.
BalasHapushgn01
Great knowledge
BalasHapus